Swept Away: The Making of
This post is long overdue! Thanks to everyone who voted for my pic, aptly named by Nupur, as the Tsunami in a Martini glass!
I have long been an admirer of Martin Waugh's Liquid Sculpture. I can literally spend hours gazing at his work, wondering, imagining, being inspired - how can one not be inspired by Big Wet Red One - and having nothing come out of it...
Much has been written on liquid art, liquid sculpture and high-speed photography. Most of it is quite advanced and requires special equipment like external flashes, strobes, high quality macro lens, a tripod and so on. I could never do justice to an image of liquid art with my now 6 year old Sony DSC-S85, a 4.1 MP camera. It may be possible with the better P&S cameras today but I do think a digital SLR camera makes a huge difference. Of the equipment listed on these various web resources, I had only the following:
A Sony A100 (digital SLR with the kit lens), with an on-camera flash
A very standard non-fancy tripod
Lots of daylight, even in winter (thank you, Colorado)
Lots of determination
and nothing else. So no external flash or strobes or fancy lights or an expensive macro lens.
I have read of people having an elaborate set up in their garage to take high speed shots of water. It would take me months to clear out my garage so I opted for my kitchen sink instead. And it was the only time that I ever felt that I should have had a white ceramic sink instead of stainless steel. I laid down a white cutting board in the sink, put a martini glass on it, which I filled with water from the faucet right above. I used a small bounce above the kitchen sink to prevent reflections of the shades and all the junk that accumulates there. I opened up the shades to allow as much daylight as I could handle - the sun was making its descent and shone right into my eyes. Not fun. I also placed a large styrofoam sheet to the right of the kitchen sink, against the cabinets, to reflect the sunlight. I then adjusted the aperture and shutter speed until I had a reasonably good looking image, like so:
This image has only been resized to 1200px by 803px and is otherwise SOOC (straight out of the camera). The readings that worked for me at this point were:
Exposure: 0.008 sec (1/125)
Aperture: f/5.6
Focal Length: 40 mm
ISO Speed: 100
Exposure Bias: 0/10 EV
Flash: Flash fired
The stainless steel kitchen sink actually appeared to work as it reflected the flash! I also adjusted the level of the flash. Unfortunately, that does not seem to be recorded anywhere or at least not in a place that I can read it off easily. But that does not matter as the flash will have to be adjusted for each setup individually.
Then, I turned on the faucet into a very steady drip, such that there was a reasonable delay between each drop. And I kept adjusting my settings and focus until I got this:
Not much change in anything but focal length.
Exposure: 0.008 sec (1/125)
Aperture: f/5.6
Focal Length: 70 mm
ISO Speed: 100
Exposure Bias: 0/10 EV
Flash: Flash fired
But that's when I knew that I would get somewhere with this. I was lucky enough to have lemons at home! Meyer lemons, they were, too! A little bit of fun with Photoshop gave me this:
But more on that later! After this, it was toss, throw and click with the flash turned on. Repeat. I ended up many variants of these, many of which had no lemon in the frame!
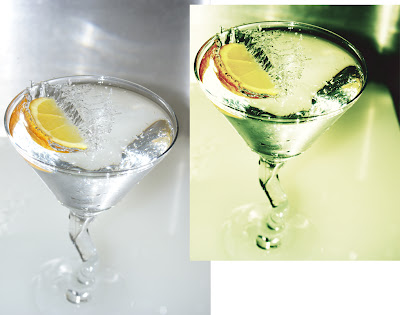
After about 100 attempts, I looked through what I had and I liked three. I cropped them and for each, I made a stack of layers with a different blend method in Photoshop until I liked what I saw. The smaller image on the right in the diptych is the result, the larger image on the left is SOOC.

To the last one, I applied the Urban Acid (zip file) action in Photoshop to give it a green cast and deepen the shadows.
This action mimics a cross-processing technique used in some glamour, fashion, and urban photography. It skews and saturates colors, while dramatically increasing contrast. The action does all this by creating an aggressive curves adjustment layer (which is user adjustable). Secondly, the action creates a black layer which can be used to desaturate/mute the colors. This can be accomplished by changing the opacity of the layer.This last one is my favorite.

I was quite thrilled when it got a thumbs up from Lara Ferroni of Still Life With for January's theme: Cheers.
And then I was overwhelmed and really really touched when I found out that the judges for Click: Liquids had selected the first of the these three for the Spectra (first place) and Concept Awards. And the cherry was when all of you voted for it and gave it the Reader's Choice Award. You have no idea how this makes me feel! Yay! Thank you all very much!
Other liquid art resources:
Mike's High Speed Photography
LeggNet's How To: High Speed Splash Photography
Stunning High Speed Liquid Photography